Tech tutorials Real-Time Data Streaming With Databricks, Spark & Power BI
By Bennie Haelen / 3 Mar 2021 / Topics: Artificial Intelligence (AI) Application development
In this tech tutorial, we’ll be describing how Databricks and Apache Spark Structured Streaming can be used in combination with Power BI on Azure to create a real-time reporting solution which can be seamlessly integrated into an existing analytics architecture.
In this use case, we’re working with a large, metropolitan fire department. We’ve already created a complete analytics architecture for the department based upon Azure Data Factory, Databricks, Delta Lake, Azure SQL and Azure SQL Server Analytics Services (SSAS).
While this architecture works very well for the department, they would like to add a real-time channel to their reporting infrastructure. This channel should serve up the following information:
- The most up-to-date locations and status of equipment (fire trucks, ambulances, ladders etc.)
- The current locations and status of firefighters, EMT personnel and other relevant fire department employees
- The current list of active incidents within the city
The above information should be visualized through an automatically updating dashboard. The central component of the dashboard will be a map which automatically updates with the locations and incidents. This view should be as “real time” as possible and will be used by the fire chiefs to assist with real-time decision-making on resource and equipment deployments.
The events originate from a variety of sources, including the 911 systems, GPS trackers, etc. All events end up in a central fire department database. Through a Change Data Capture (CDC) infrastructure, these events are forwarded to an Enterprise Service Bus (ESB). Our proposed solution should tie into this ESB.
A high-level overview of the above use case is shown below:

The details of how events are forwarded from the ESB to the cloud ingestion channel are beyond the scope of this tutorial, but in summary, we created a WebSockets-based component hosted in an Azure web app. This component consumes the events from the ESB and forwards them to our cloud ingestion channel in a JavaScript Object Notation (JSON) format.
High-level architecture
Now that our use case is well-understood, we’re ready to define the core architectural components.
As we study the use case, we uncover the following set of high-level requirements:
- We need to ingest the event data stream into a cloud-based infrastructure. Anticipated event rates are 100+ events per second, therefore the solution requires a high-performance, fault-tolerant ingestion service.
- We need to stream the events off our ingestion service and perform several domain-specific conversions. Therefore, we need a real-time streaming analytics solution for this task.
- We need to land the processed data in a high-performant data store that can capture the real-time data for our resources and equipment. The solution should have keyed access to the data and should be able to perform direct UPSERT operations to merge the newly arrived events with previously existing records. To summarize, we need a high-performant, transactional big data ACID store.
- Finally, we need to be able to visualize the data in a dashboard which includes our real-time map. The map updates should be triggered directly by the data changes in the underlying data store.
Since this solution was first implemented on Azure, we’ll be leveraging Azure components. I will be posting follow-up tutorials, which describe this implementation on other cloud platforms such as Amazon Web Services (AWS) and Google Cloud Platform (GCP).
Based upon the above requirements, the main architectural components selected for this solution are shown in the figure below:

Here’s a brief overview of each architectural component selected:
- Our ingestion channel will be Azure Event Hubs. Event Hubs is a fully managed, real-time data ingestion service. It enables us to stream millions of events per second from any source. It also has a Kafka-compatible interface for both Kafka clients and applications, which enables easy integration with the popular Kafka ecosystem.
- Our analytics engine will be Databricks. Databricks gives us a data analytics platform optimized for our cloud platform. We’ll combine Databricks with Spark Structured Streaming. Structured Streaming is a scalable and fault-tolerant stream-processing engine built on the Spark SQL engine. It enables us to use streaming computation using the same semantics used for batch processing.
- Our storage media of choice will be Delta Lake. Delta Lake is an open-storage layer which enables us to execute ACID transactions against data lake files and Hive tables built on top of Delta Lake files. It will allow us to perform UPSERTs against the Delta tables, enabling us to merge the newly arrived data with previous records.
- Power BI is our real-time visualization selection. Power BI can issue direct queries against Delta tables and allows us to define visualization update triggers against data elements.
In the next sections, we’ll take a look at each component in detail as we flesh out the design details.
Detailed architecture: Delta Lake tables
A central component of our architecture will be the storage of the real-time data in Delta Lake tables. Since we’re using Delta, we’ll have the ability to use ACID transactions to update the table.
In the context of this tutorial, we’ll limit the use case scope to the tracking of fire department units. Therefore, we only require a single Delta table, which will keep track of the geographic location of a fire department unit. We’ll name this table: UnitStatus.
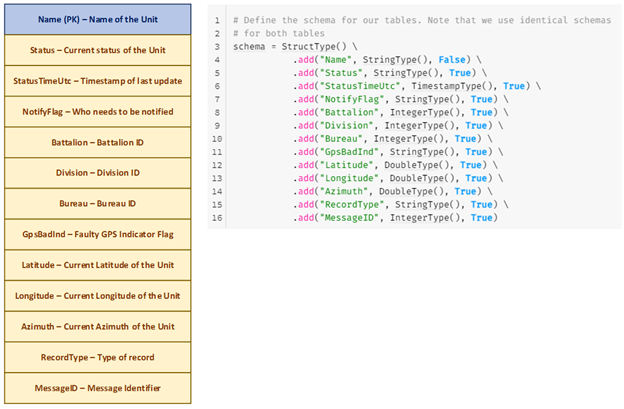
The unique identifier of a fire department unit is its Name, which will be the primary key of the table. Other significant information in the table includes:
- The current Status of the unit, together with the StatusTimeUtc timestamp of the last update
- The fire department Battalion, Division and Bureau identifiers
- The full geographic location of the unit, as described by its Latitude, Longitude and Azimuth columns
The different columns of the table, together with the PySpark python code used to describe the schema, are shown in the figure below:
To create the table, we create a generic notebook with a createDeltaTable function. This function is shown below:
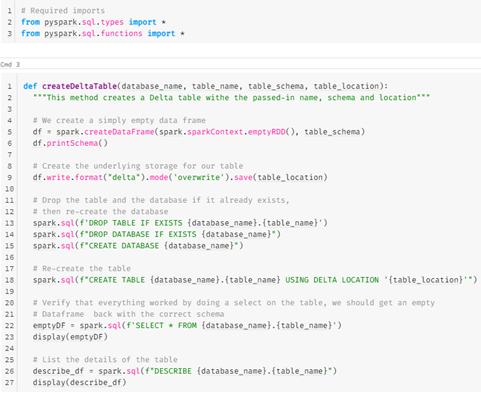
In this example, we first create an empty DataFrame with the passed-in schema. We then write this DataFrame to the specified Delta file. Using an empty DataFrame like this is a nice trick to create a Delta file with a specified schema.
We’re assuming that we create a dedicated Hive database for our solution, so we create the Hive Database and Delta table on top of our Delta file. Notice the Create Table Using Delta Location syntax. This syntax enables the Hive metastore to automatically inherit the schema, partitioning and table properties of the existing data — effectively importing this data into the metastore.
When we execute the above notebook with the parameters below:

We see that the table is created successfully:
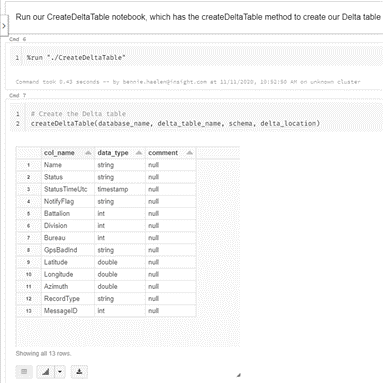
Now that we have our Delta table created, we return to Databricks, where we’ll leverage Spark Structured Streaming to ingest and process the events, and finally write them to the above Delta table.
Event processing with Spark Structured Streaming on Databricks
Structured Streaming overview
Structured Streaming is an Apache Spark Application Programming Interface (API) that enables us to express computations on streaming data in the same way that we would express batch computations on static (batch) data. The Spark SQL engine performs the computation incrementally and continuously updates the results as new streaming data continues to arrive.
In addition to using the standard DataSet/DataFrame API’s in Scala, Java, Python or R, you can also express streaming aggregations, event-time windows, stream-to-batch joins, etc. The computations are executed on the standard optimized Spark SQL engine. In addition, Structured Streaming ensures end-to-end delivery semantics. Fault tolerance is delivered by means of a checkpointing and a write-ahead logging process.
To create a robust, production-grade streaming application we must provide robust failure processing. If we enable checkpointing for a streaming query, we can restart the query after a failure and the restarted query will continue at the exact point where the failed one left off, while ensuring fault tolerance and data consistency guarantees. We’ll demonstrate how to enable checkpointing in our streaming implementation when we study the code.
Write-ahead logs have been used for a long time in databases and file systems to ensure the durability of any data operation. The intention of the operation is first written down in a durable log, and then the operation is applied to the data. If the system fails in the middle of applying the operation, it can recover by reading the log and reapplying the operations.
In Spark Structured Streaming, when write-ahead logs are enabled, all the received data is also saved to log files in a fault-tolerant file system. This allows the received data to be durable across any failure in Spark Streaming. If you enable checkpointing, as we’re doing, the specified directory will be used for both checkpointing as well as write-ahead logs.
Use-case-specific implementation
In our streaming implementation, we need to perform the following steps:
- We need to connect to Azure Event Hubs.
- We need to set up an input data stream which reads from Event Hubs.
- Once we have read a micro-batch of events from the input stream, we need to process those events and write them to the UnitStatus table.
Note: We’re using a micro-batch approach to processing in this use case, since it meets the latency requirements of the client. In a future post, we’ll modify the architecture to levverage the Continuous Processing Mode available since Spark 2.3.
Connecting to Azure Event Hubs
To connect to Azure Event Hubs, we’ll use the com.microsoft.azure:azure-eventhubs-spark_2 library, which implements to Azure Event Hubs Spark connector. This library is implemented as a Maven coordinate. Simply add the most recent Maven coordinate to your Databricks cluster, as shown below:

We stored the Event Hubs connection string in Key Vault and use an Azure Key-Vault-backed Databricks secret scope to read it, as shown below:

Reading an event stream from Azure Event Hubs
To start reading from Event Hubs, we can use the standard spark.readstream method. We specify the format of “eventHubs” and build and pass in our full connection string in the configuration object, as is shown below:
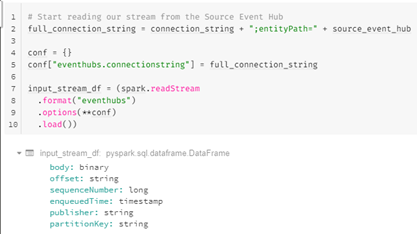
The schema of the input stream is shown above. The body is always provided as a byte array. In the next step, we’ll use the Spark’s withColumn function to convert all fields to Spark-compatible types. We’ll only be working with the body column going forward, but I’ve included the appropriate conversions for each column below in case you need to utilize the other columns:

As we can see, all columns are now converted to easy-to-use types and, most importantly, our body column is now accessible as a string. The actual contents of the body column will be the JSON object, written by our WebSockets event-forwarding component as mentioned at the start of this article.
Processing micro batches
Spark streams support micro-batch processing. Micro-batch processing is the practice of collecting data in small groups (aka “batches”) for the purpose of immediately processing each batch. Micro-batch processing is a variation of traditional batch processing where the processing frequency is much higher and, as a result, smaller “batches” of events are processed.
In Spark Structured Streaming, the .foreachBatch() function can be used. In this case we pass in a reference to a function (referred to as the foreachBatch sink function) which will receive the batch:

In the above code snippet, I want to point out two interesting facts:
- We specify a checkpointLocation. As we mentioned at the start of our streaming discussion, having a checkpoint defined like this will enable us to stop and restart our streaming process seamlessly, since it will pick up at the exact event hubs offset where it was stopped. In addition, it will enable the write-ahead logging process.
- We pass in the name of our process_unitstatus_micro_batch sink function, which is the function which will receive the micro batches in the form of a Spark DataFrame.
The process_unitstatus_micro_batch function receives two parameters:
- The micro-batch DataFrame with the batched records as described above
- A batch identifier which by default is a sequential identifier for the batch This is shown in the figure below:

The advantages of using a micro batch function like this are listed below:
- A micro batch sink function receives data as a standard (non-streaming) Spark DataFrame. This means that we can use batch DataFrame operations like count, which cannot be used on a streaming DataFrame.
- You can implement foreachBatch sinks unsupported by Spark Structured Streaming and writing to multiple sinks can be executed successfully.
- You can alter the batch_id to have a custom format like a timestamp. It will default to a zero-based integer (0, 1, 2, …).
Now that we have defined our foreachBatch sink function, we can start our processing. We need to execute the following steps:
- We need to define the schema for the events in the body of the Event Hubs messages.
- We need to extract the body column from the message and parse out those columns that we need to write to our Delta table.
- We need to ensure that we don’t have duplicates in our micro-batch. We can use the dropDuplicates DataFrame method for this purpose.
- Next, we need to update of UnitStatus Delta table. We can UPSERT our newly arrived micro-batch events with the existing data in the table by means of the Delta merge statement.
First, we define the schema for the body of our Event Hubs messages, as shown below:
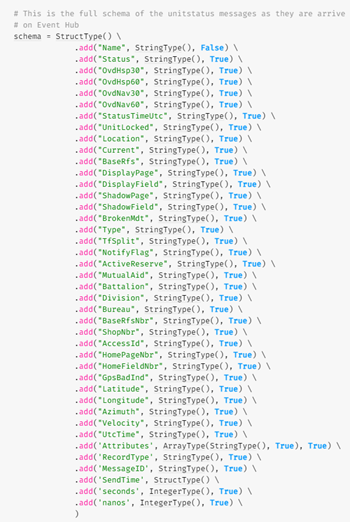
Next, we create a Spark DataFrame from the body column in the Event Hubs message. Since the body is defined as JSON, we use from_json to select the body property and select all properties through an alias as is shown below:

Now that we have a legitimate Spark DataFrame, it’s straightforward to extract out the columns we need for our UnitStatus table:

Next, we perform a simple de-duplication of our DataFrame with the dropDuplicates method:

We’re using the Name column as the primary key for our Delta table, so we can update our Delta table with a simple merge statement:

We simply join our micro-batch DataFrame with the UnitStatus table over the Name column and perform the merge.
This completes our Databricks activities. We can now ingest our messages from Event Hubs, process the messages, extract the data we need, perform our required transformations and finally update our UnitStatus table — which provides us with a real-time view of the fire department equipment and personnel.
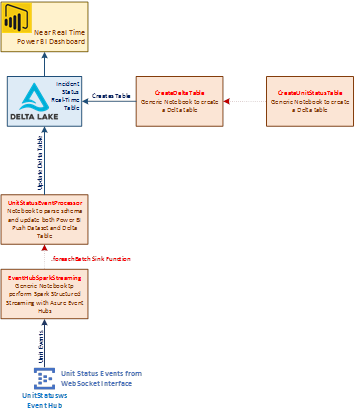
The listing below provides an overview of the components that we’ve created so far:
- The CreateUnitStatusTable notebook invokes the generic CreateDeltaTable with the appropriate parameters to create our UnitStatus table.
- The CreateDeltaTable notebook is a generic notebook which creates a Delta table.
- The EventHubSparkStreaming notebook reads the events from Event Hubs and invokes the foreachBatch sink function implemented in UnitStatusEventProcessor notebook.
- The UnitStatusEventProcessor processes the events, performs the transformations, and finally updates our UnitStatusTable.
A diagram with the component relationship is provided below:
Visualization with Power BI
The Power BI DirectQuery functionality
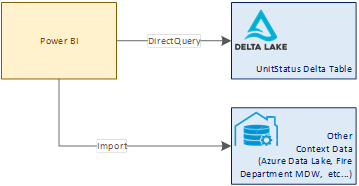
We’ll be using the DirectQuery functionality of Power BI to connect to our UnitStatus Delta table. Unlike the import functionality, which copies (or imports) the tables and columns into Power BI, DirectQuery doesn’t perform any copying of the data. At both design time and runtime, Power BI will directly query the underlying data source.
Using DirectQuery has several advantages:
- DirectQuery enables us to build visualizations over very large datasets, where it would otherwise be unfeasible to first import all the data.
- Underlying data changes require a refresh of data. For some more complex reports, the need to display current data can require large data transfers, making reimporting data impractical. By contrast, DirectQuery reports always use current data.
- Certain data limitations in Power BI do not apply to DirectQuery.
Since the DirectQuery paradigm fits our model well, we will use it to connect to our UnitStatus table, while importing other context data required for our report, as is shown below:
Power BI automatic page refresh
When you display real-time data, it’s important for data in your reports to be refreshed as soon as the data is updated. As critical events are happing the fire department captains should be made aware immediately. The automatic page refresh in Power BI enables us to query for new data, under the condition that the data source is a DirectQuery data source.
When using automatic page refresh, we have two options available:
- Fixed interval: This refresh type allows us to update all visuals in a report page based on a constant interval, such as one second or one minute. When that specific interval is reached, all visuals in that page send an update query to the data source and update accordingly.
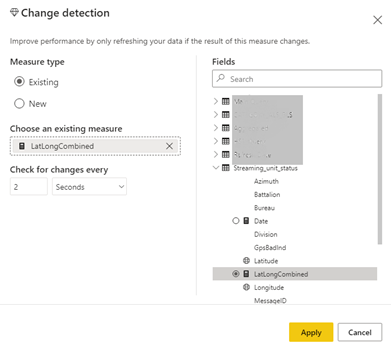
- Change detection: This refresh type allows us to refresh visuals by detecting changes in the data rather than a specific refresh interval. Specifically, this measure polls for changes to our DirectQuery UnitStatus data source. Besides defining the measure, we also must select how often Power BI will check for changes. On the Power BI service, this refresh type is only supported in workspaces that are part of a premium capacity.
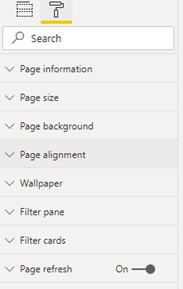
The page refresh switch can be found in the format section of the report, as is shown in the figure below:
Below is a sample of the change detection setup dialog. In this case, we have our refresh defined for a combined latitude/longitude measure, which we are checking every two seconds:
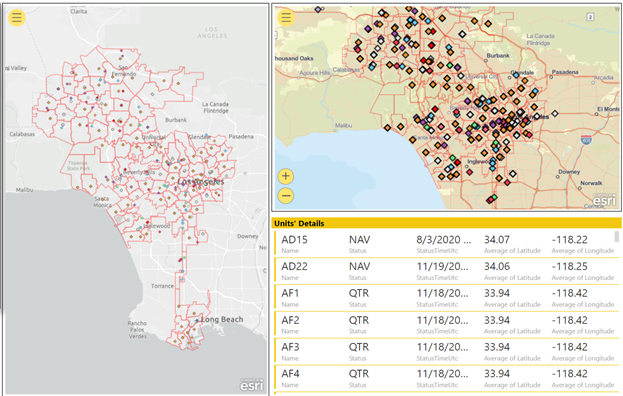
Below is a complete report, combining the real-time data with standard imported reference data:
Summary
By following the steps in this tutorial, you’ll be able to use the combination of cloud-based services with Azure Databricks and Spark Structured Streaming to create a robust, faut-tolerant, near-real-time experience.


